Appearance
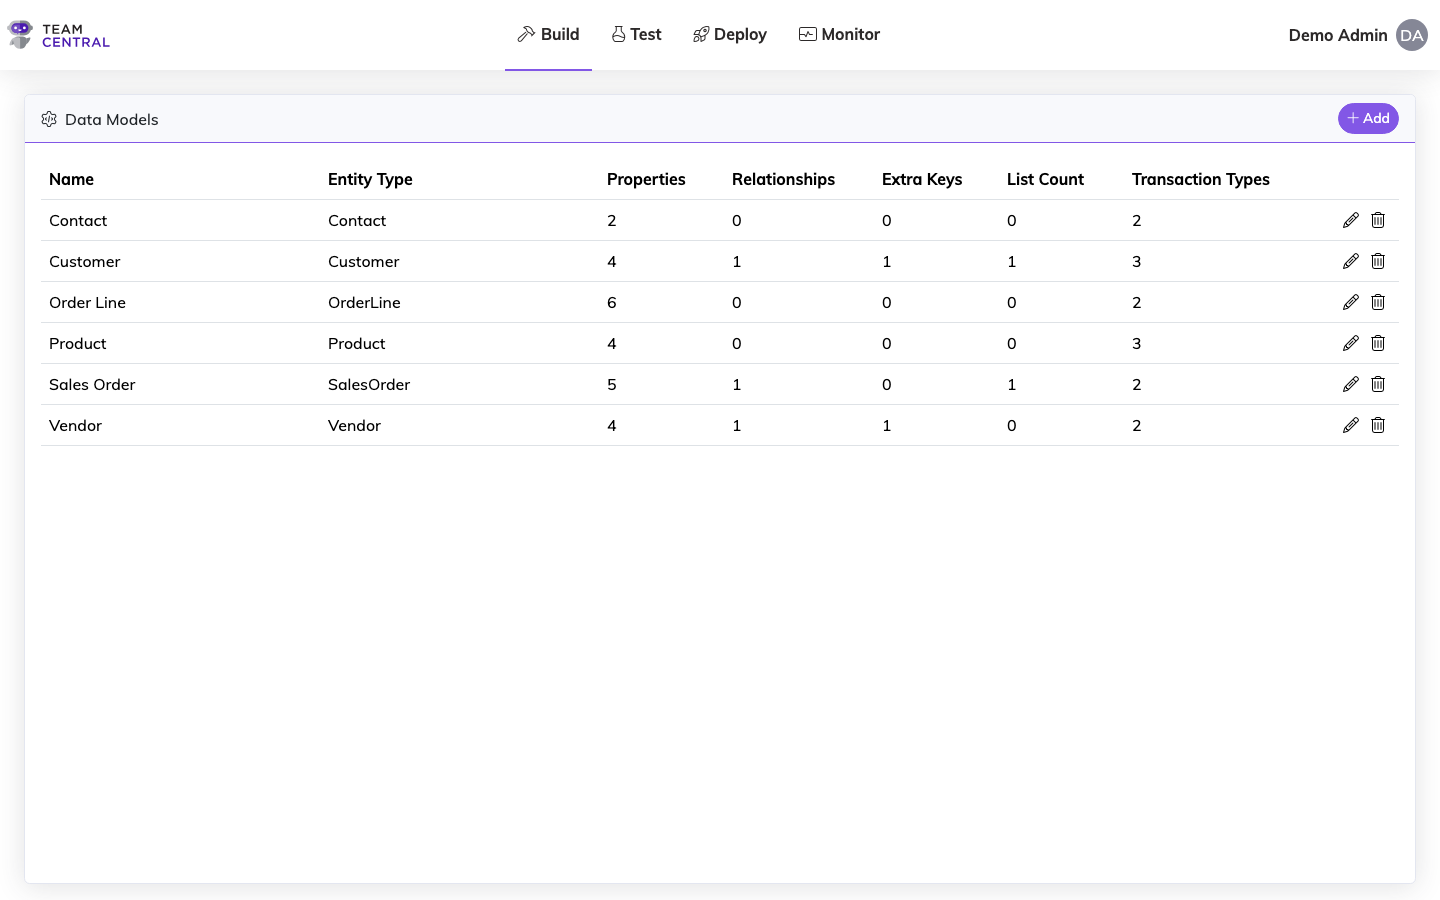
Data Models
Data Models are built by identifying and defining Schema Definitions and assigning Schema Properties to each. A Schema Definition is the whole of the data you are trying to define, while the components that make up that data are Schema Properties. For example, a Schema Definition could be Customer, while Customer Name is a single Schema Property.
You can define Schema Properties via three methods: Simple, Foreign Key, and List. You can add multiple Properties, as well as multiple Property Types, to a single Schema Definition.
Key Features
- Entity Types — Define schemas for Customer, Sales Order, Product, Vendor, and other entity types
- Property Maps — Configure properties and their mapping types (Property, ForeignKey, CustomData)
- Relationships — Define foreign key relationships between entities
- List Properties — Support for nested/child entity collections (parent/child hierarchies)
- Transaction Types — Specify supported operations that pair Publishers and Subscribers
- Extra Primary Keys — Handle edge cases where entities exist in multiple tables
Each Schema Property can also be edited to include:
- A Description for additional context (e.g. distinguishing between multiple Inventory schemas with descriptions like Picked or Received)
- A Related Data flag, which makes this property available to related entities during sync events (e.g. a Customer's name can be carried onto a Sales Order). See Related Data for details on how this works.
- Chat Form Controls that help build the AI model
Best Practice
- Develop naming convention standards early (consistent case, hyphen usage, etc.)
- Use Simple Schema Definitions when available
Schema Types
Simple Schema Definition
A Simple Schema Definition is a single value-to-value transaction. It represents data that is both common and static, meaning it applies to all (or most) of your data systems and is unlikely to change between systems (e.g. Customer Name). When defining Simple Schemas, your Schema Definition must align and link to a property defined by the Common Model (a Central Property).
Extra Primary Keys
Extra Primary Keys are used when the same Entity needs to exist in multiple tables within a given system. For example, Locations or Divisions may have their own database table but also be replicated into a Departments table. This feature is generally only used in edge cases where a system has unique data storage methodologies.
Foreign Key Schema Property
Foreign Key definitions are references to data that may be different from one system to the next — such as a customer record number in your sales system vs. your billing system. These definitions are customer-built and customized to your specific needs. Some Foreign Key Entity Types will need to be further defined with a Sub-Type (e.g. a Company could be sub-classified as a Customer or Vendor).
List Schema Property
A List Schema is a pointer to another Schema, used for parent/child customizations. For example, an order has a list of line items, and each line item has its own Schema defining Quantity, Amount, Discounts, etc. Any parent/child data should be defined within a List Schema.
Transaction Types
Transaction Types are events that become part of the Schema, physically pairing a Publisher and a Subscriber. They identify the actions you want to take on the data, such as Save Customer or Delete Customer. Transaction Types tie directly to a Schema Definition, enabling users to select those actions when adding Endpoints.
WARNING
Each Schema Definition must be assigned one or more Transaction Types. The Transaction Types created during this process will become part of a selectable list when adding Endpoints to map your data.
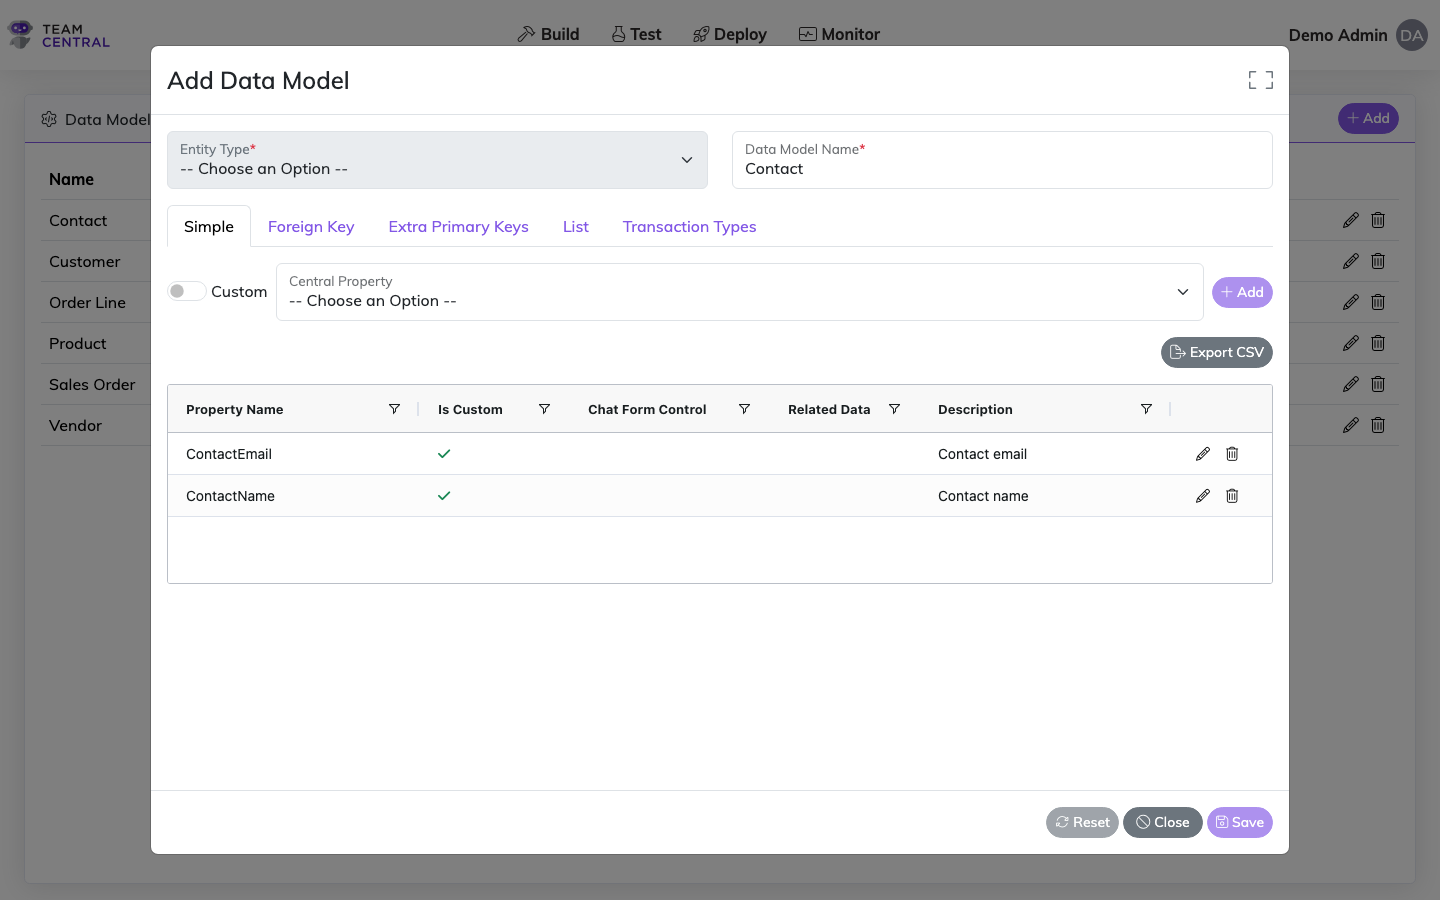
Add a Schema Definition
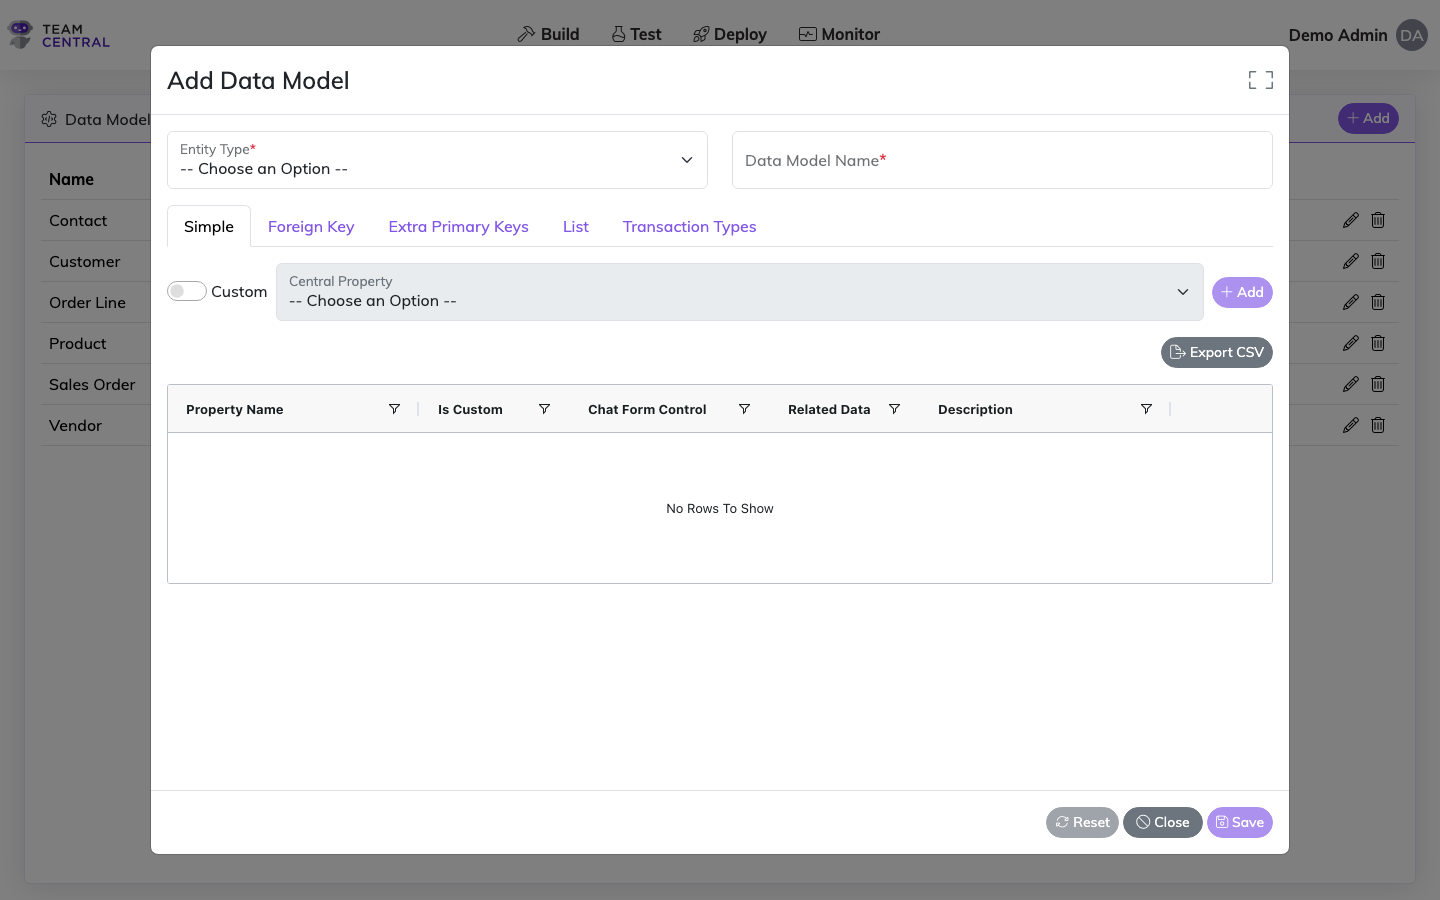
Select Build > Data Models from the main menu.
Select + Add.
Select an Entity Type; and as needed, enter a Sub-Type.
TIP
Once created, the Entity Type and Sub-Type cannot be modified.
WARNING
A Sub-Type can be defined for several pre-determined Entity Types and adds a more precise attribute to that Schema. They allow Schemas defined by the same Entity Type to be cataloged into more precise groupings, enabling the Common Model to group relationships in the database even when the data is housed in different systems.
For example, a Schema with the Entity Type "Company" may be further classified into Sub-Types "Vendor" and "Customer." The Sub-Type discloses which relationship this particular Schema refers to.
- The Sub-Type field will appear only for supported Entity Types
- Each Sub-Type must be entered precisely (e.g. Vendor vs vendors will create two separate sub-types)
- When adding a Foreign Key with a new Entity Type, you can select a previously created Sub-Type from the drop-down menu
- Enter a Schema Definition Name.
WARNING
Do not add spacing to any field entries.
- Assign Schema Properties to the Definition using one or more of the tabs below:
Adding a Simple Property
- Ensure the Simple tab is selected
- Select a Central Property from the drop-down menu; or toggle Custom ON to enter a custom Property
- Select + Add — the Central Property will be added to the table
- Repeat as needed for additional properties
Example
You may create a Schema Definition named Customer Schema to define all pertinent company data, including Properties such as Name, PrimaryBillingAddress1, PrimaryBillingAddress2, PrimaryBillingCity, etc.
Adding a Foreign Key Property
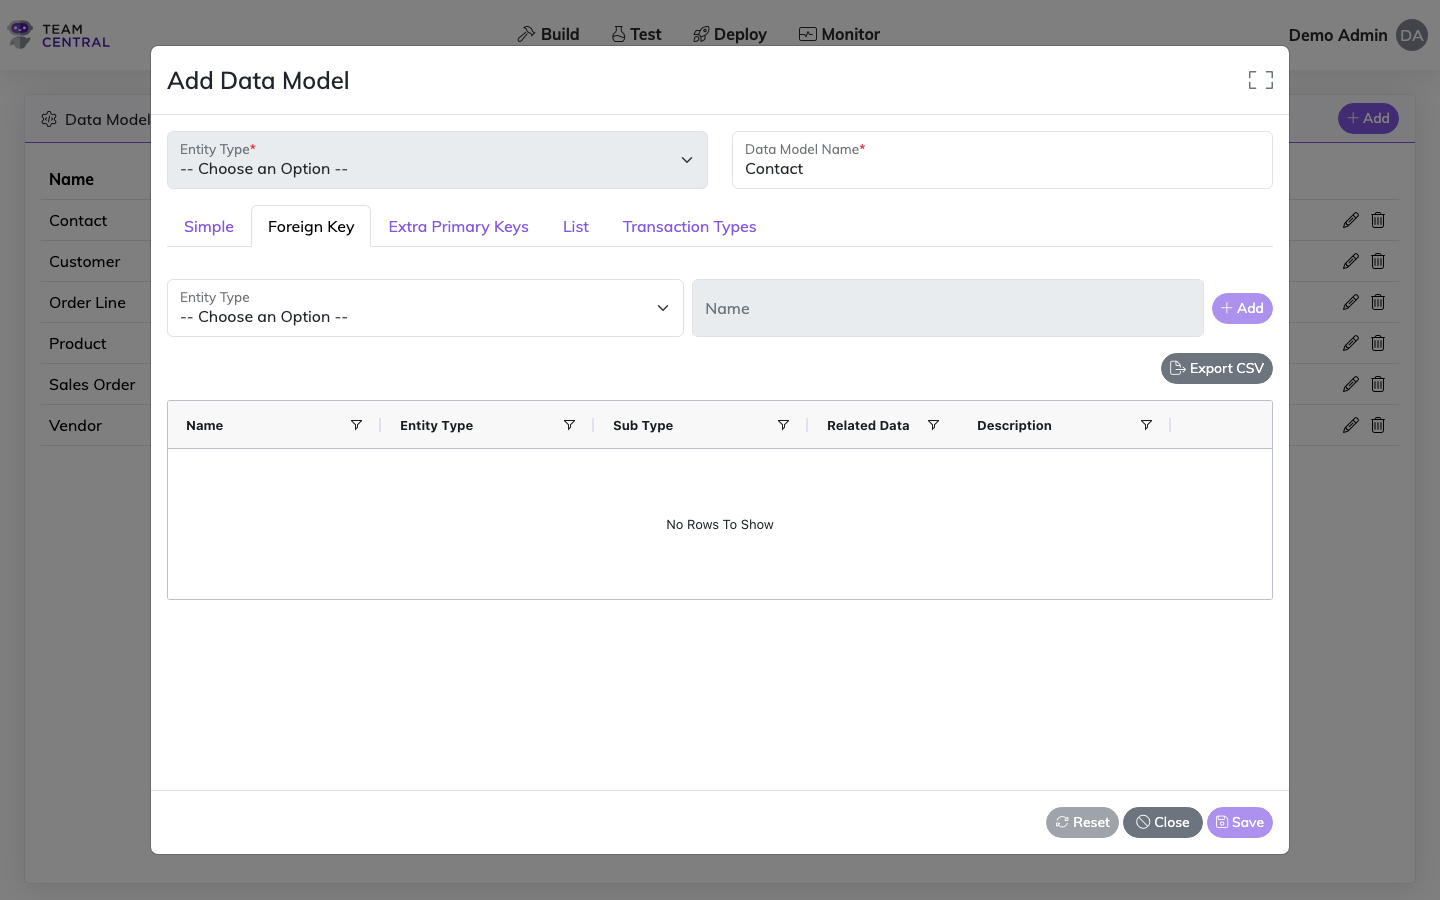
- Select the Foreign Key tab
- Select an Entity Type from the drop-down menu; and if applicable, select a Sub-Type
- Enter a Name in the text field
- Select + Add
- Repeat as needed
TIP
The Sub-Type menu will only appear for applicable Entity Types.
Adding Extra Primary Keys
- Select the Extra Primary Keys tab
- Enter a Key Name; then select + Add
Best Practice
When naming Extra Primary Keys, give them a name representative of what the additional table in the system is called.
Adding a List Property
- Select the List tab
- Select a List Property from the drop-down menu
- Select a Data Model from the drop-down menu
- Select + Add
- Repeat as needed
TIP
Only selectable options will be shown. The List Property menu is filtered based on your Entity Type selection, and the Schema menu is filtered based on your List Property selection.
WARNING
You can add multiple Schema Properties of multiple types to a single Schema Definition. However, to create a List Property, you must first define each list item as its own Schema Definition.
- Select the Transaction Types tab.
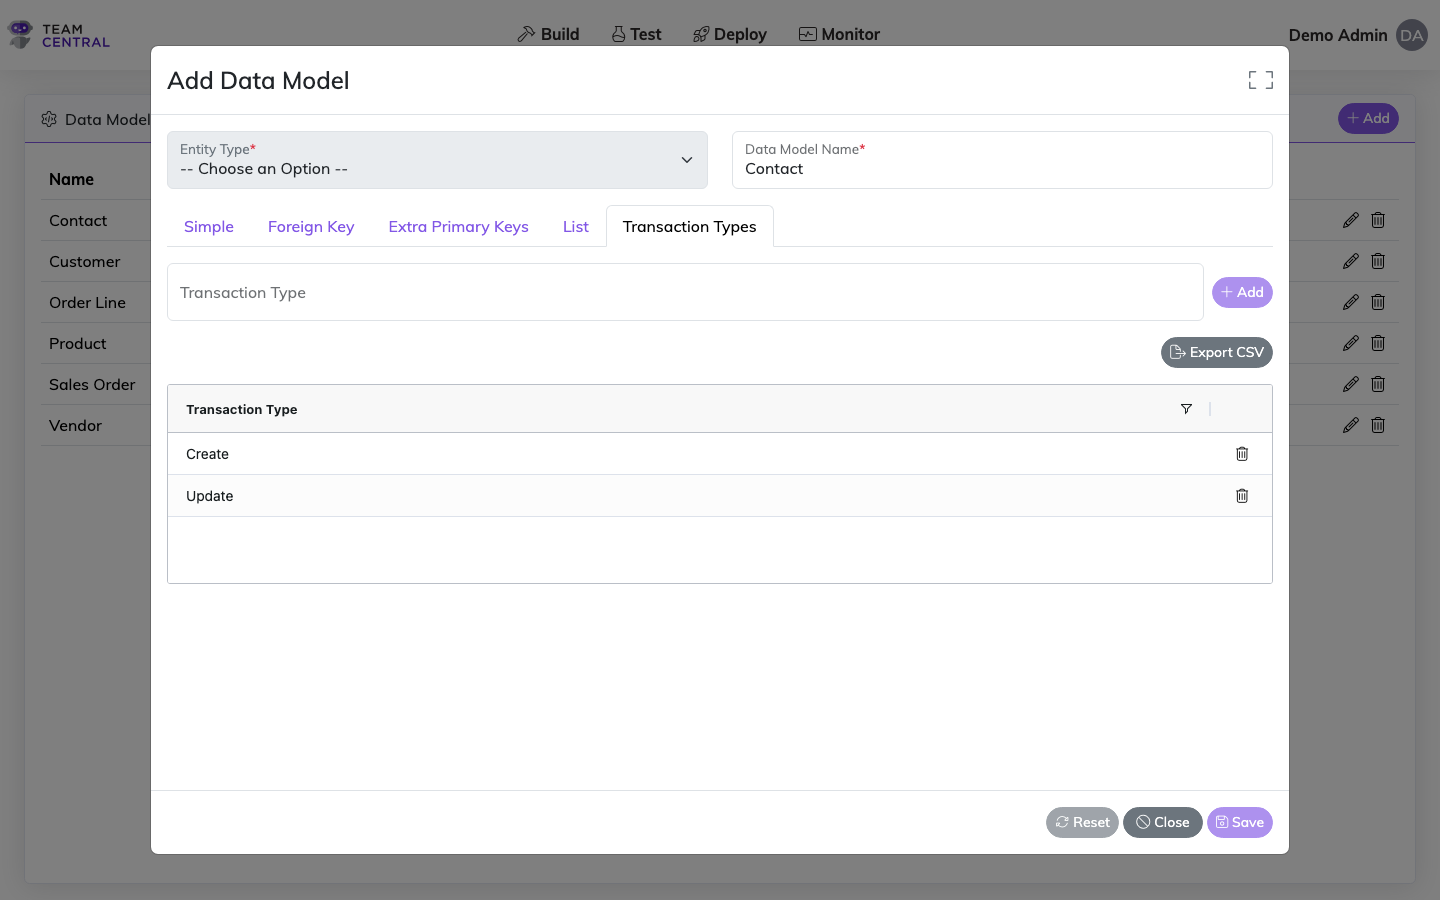
- Enter a Transaction Type in the text field; then select + Add. Repeat until all necessary Transaction Types are added.
WARNING
- Transaction Type is a freeform text field to describe the event name, ultimately linking Publishers and Subscribers together. When messages get published under a certain Transaction Type, only subscribers to that Transaction Type will process it.
- Multiple Transaction Types can be added to a single Schema Definition for micro-level messaging, publishing the same data in several ways, or targeting/isolating integrations.
- Schema Definitions and Transaction Types can be built incrementally and amended at any time. However, both must be completed prior to mapping Endpoints.
- When finished, select Save.
Edit a Schema Definition
Select Build > Data Models from the main menu.
Select the edit icon in the appropriate Data Model row.
- Modify the attributes as needed using the operations below:
TIP
Once created, the Entity Type and Sub-Type cannot be modified.
| To | Do this |
|---|---|
| Edit the Schema Definition Name | Enter a new Schema Definition Name in the text field |
| Add a Schema Property | Follow the instructions in the Add a Schema Definition section above |
| Add a Schema Property Description | On the Simple tab, select the edit icon in the appropriate row. Enter the Description, then select Save |
| Toggle Related Data | On the Simple tab, select the edit icon. Toggle ON the Related Data switch, then select Save. This makes the property available as Related Data on entities that reference this schema via a foreign key. |
| Include in Chat Form Control | On the Simple tab, select the edit icon. Toggle ON Chat Form Control, choose a Control Type, enter a Label and Default Value, toggle Required as needed, enter a Form Sequence and Group Name, then select Save |
| Delete a Schema Property or Transaction Type | Select the appropriate tab, then select the delete icon in the appropriate row |
- When finished, select Save.
TIP
To discard all changes and exit edit mode, select Cancel. To reset all edits made during this session and remain in edit mode, select Reset.
Delete a Data Model
Select Build > Data Models from the main menu.
Select the delete icon in the appropriate row.
Select OK to confirm.
WARNING
Deleting a Schema Definition cannot be undone; you must recreate it if needed.
Host Type Extensions
Advanced Tool
Host Type Extensions enable developers to take a pre-built Central Connector and extend it for specific needs (i.e. build your own override). The Host Type references the location in the cloud where your customizations are hosted to run.
Central supports three deployment methods:
- Embedded — The connection runs embedded in the agent, usually for network purposes. If Central needs to get data from within a company's network, the agent accesses the data sources directly.
- Cloud-based — The connection runs via a cloud-based Connector. Central runs on Microsoft Azure and distributes data via proxy method. This is the typical method employed by Central.
- Custom — The connection runs via host type extensions built and customized by the developer. You build a company-specific space in the cloud (e.g. Google Cloud, AWS) to host a Connector and override functionality for your specific needs.
Add a Host Type Extension
- Select Build > Custom Extensions from the main menu.
- Select + Add.
- Enter a Name in the text field.
- Enter the appropriate Secure Settings.
- Select Save.
TIP
To view entered secure settings data, select Hide All or View All, or toggle the View/Hide icon in the entry field.
Edit a Host Type Extension
- Select Build > Custom Extensions from the main menu.
- Select the edit icon in the appropriate row.
- Modify the Name and/or Secure Settings as needed.
- Select Save.
Delete a Host Type Extension
- Select Build > Custom Extensions from the main menu.
- Select the delete icon in the appropriate row.
- Select OK to confirm.